Custom CSS cursors and offset
Recently, I was working on a client project that required a custom cursor to be displayed when a user hovered over a specific piece of embedded content. I knew that could be achieved with CSS but with little experience with custom cursors, this was a good opportunity to expand my knowledge in that area.
Different cursor types
Browsers provide a multitude of cursor types for different use cases out of the box (see below).
General
autodefaultnone
Links & status
context-menuhelppointerprogresswait
Selection
cellcrosshairtextvertical-text
Drag & drop
aliascopymoveno-dropnot-allowedgrabgrabbing
Resizing & scrolling
all-scrollcol-resizerow-resizen-resizee-resizes-resizew-resizene-resizenw-resizese-resizesw-resizeew-resizens-resizenesw-resizenwse-resize
Zooming
zoom-inzoom-out
How to set a custom cursor in CSS
If possible, I would recommend using one of the default browser cursors as your users are likely to be more familiar with it. But, if you must introduce a new custom cursor then this is how to do it:
cursor: url(cursor1.png), auto;Use a URL to point to the location of your custom cursor file. You must declare which cursor the browser should fall back to if it cannot load your custom file ('auto', in the example above).
You can also declare multiple custom cursors by comma separating them:
cursor: url(cursor1.png), url(cursor2.png), auto;Most image types types are supported, including SVG. However, you cannot use animated SVGs. The animation will be ignored and the cursor will appear static.
Offsetting a custom cursor
Being able to change the pointer position (i.e., the hotspot) is extremely important when using a custom cursor. We can do this with x and y coordinates.
If we don't specify x and y coordinates for our custom cursor, a value of 0 0 is used (see box 2 in the example below).
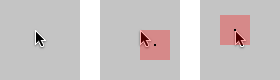
As you can see, we have a problem. The hotspot of my custom cursor (the black dot in the middle of the red box) isn't where the hotspot actually is (the tip of the default cursor).
My custom cursor is 30x30 pixels, so by adding x and y coordinates with the value of 15 15, we can tell the browser where the focal point of the custom cursor is (box 3 in the example above).
cursor: url(cursor1.png) 15 15, auto;Now that the hotspot is correct, users will be able to accurately click the elements within your site.